Tiramisu February 19, 2010
Posted by Helen in dessert.add a comment
Another recipe from good old Gordon. This is an easy (i.e., cheat) tiramisu recipe, but it still tastes positively decadent and is definitely not light on calories either. But I think it’s well worth it.
Ingredients
250g mascarpone
1 tsp vanilla extract
3 tbsp Marsala (or brandy or Tia Maria)
150ml strong coffee or espresso, cooled to room temperature
150ml single cream
4 tbsp icing sugar
16 sponge fingers (savoiardi)
Chocolate (at least 70%), to grate
Cocoa powder, to dust
Whisk the mascarpone with the vanilla and Marsala and 50ml coffee, until everything is thoroughly mixed together.
Whisk the cream with the icing sugar until smooth, then fold in the mascarpone mix.
Pour the remaining coffee into a bowl (sweeten with more icing sugar if you like). Take one sponge finger at a time and dip it in to the coffee. Set it to one side and continue with the remaining biscuits
Line 4 serving glasses or bowls with 4 sponge fingers, breaking them in half if you need to. Spoon the mascarpone mix in until you reach the top of the glass. Refrigerate for 20 minutes to allow the flavours to infuse.
Remove the tiramisu from the fridge. Grate a little chocolate over the top of each one. Finally, dust with sifted cocoa powder to serve.
Potatoes dauphinoise February 17, 2010
Posted by Helen in potatoes, side dishes.4 comments
These potatoes gave me a chance to try out my new mandolin, which was loads of fun! I’m now searching for recipes that involve slicing things thinly. Suggestions are welcome. This was also an incredibly easy recipe, though the results looked (and tasted) really impressive. It’s definitely one I’ll be using again. Thank you, Good Food.
Ingredients
1 clove garlic, halved
50g butter
500g waxy potatoes, thinly sliced
Grated nutmeg
300ml milk
300ml double cream
Grated Gruyère cheese for sprinkling (optional)
Set the oven to 180°C (160°C fan). Rub the cut sides of the garlic all over the insides of an ovenproof dish, then grease the dish with butter.
Put a layer of potatoes in the bottom of the dish. Season with salt and freshly ground black pepper and grated nutmeg. Add another layer of potato, season again and press down on the potatoes (the dauphinoise should be dense). Continue building up the layers until you reach the top of the dish, patting down each time.
Mix the milk and cream together and pour over the potatoes, making sure the liquid just covers the surface. Sprinkle the top with cheese, if liked.
Bake for 2 hours. Serve when the potatoes have softened and turned golden brown on top, while the cream is still bubbling.
Sticky lemon chicken with champ February 2, 2010
Posted by Helen in chicken, Uncategorized.add a comment
As much as I hate to admit it, Gordon Ramsay is pretty good. This was a perfect weeknight supper. Not too heavy (unless, of course, you eat as much champ as my husband does), and lovely served with steamed green beans. The recipe below serves 4, so I halved it. Rather than using a whole chicken, I used a breast and two thighs (something that seems to work well for us since I prefer white meat).
Ingredients
Lemon chicken:
1 large chicken, jointed into 8-10 pieces
Salt and pepper
3-4 Tbsp olive oil
1 head of garlic, halved horizontally
A few thyme sprigs
A splash of sherry vinegar
2 tbsp dark soy sauce
3 tbsp honey
1 lemon, finely sliced
Bunch of flatleaf parsley, chopped
Champ:
1 kg floury potatoes (e.g., King Edward), peeled
Salt and pepper
30g butter
Bunch of spring onions (8-10), trimmed and chopped
100ml double cream
100ml whole milk
Season the chicken with salt and pepper and heat the olive oil in a large sauté pan. Brown the chicken pieces (in batches if necessary) over a high heat with the garlic and thyme for 2–3 minutes on each side until golden brown. Return all the chicken to the pan, add the sherry vinegar and bubble until reduced by half. Drizzle over the soy sauce and honey and shake the pan to mix.
Pour in a good splash of hot water and add the lemon slices. Let the liquid bubble and reduce down until syrupy, which will take about 10 minutes or so. By now the chicken should be cooked through.
Cut the potatoes into similar-sized chunks and boil in salted water for about 10 minutes, until tender when pierced with a small sharp knife. Drain well.
Mash the potatoes while still hot, using a potato ricer if you have one, then stir through the butter and spring onions.
Pour the cream and milk into a saucepan and bring just to the boil. Take off the heat and gradually pour on to the potatoes, mixing well. If the mash is too thick, add a little extra milk. Season generously.
Transfer the chicken to a platter and sprinkle over the chopped parsley, serve with the champ and green beans.
Moroccan baked chicken with chickpeas and rice January 23, 2010
Posted by Helen in chicken.add a comment
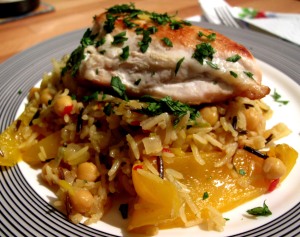
Another delicious dish, courtesy of Delia, which I loved but which didn’t impress my husband. Ah, well. All the more for me! I also love this recipe because everything cooks in one dish, making my life much easier. The recipe, as written, serves 4, so I halved it. Also, rather than using a whole chicken, I used a breast for me and a couple of thighs for the husband. I also substituted tinned chickpeas for dried since I had them on hand.
Ingredients
1 x 1½-2 kg chicken, jointed into 8 pieces; or use a pack of 8 drumsticks and thighs
11og dried chickpeas
175g brown basmati rice
1 level tsp cumin seeds
1 level tbsp coriander seeds
½ level tsp saffron stamens
2 small lemons
2 yellow peppers
2 onions
2 tbsp olive oil
15g fresh coriander
3 cloves garlic, chopped
2 fresh chillies, halved, de-seeded and finely chopped
275ml chicken stock
150ml dry white wine
50g pitted black olives
50g pitted green olives
Salt and pepper
Pre-heat the oven to 180°C (160°C fan).
If you’re using dried (rather than tinned) chickpeas, there are two ways to deal with them. The easiest is to pop them into a bowl, cover them with cold water and leave them overnight or for a minimum of 8 hours. But, if it slips your mind, what you can do is place them in a saucepan, cover them with cold water and bring them up to the boil for 10 minutes. Then turn off the heat and let them soak for 3 hours. Either way, when you want to start making this recipe, the chickpeas need to be simmered for 20 minutes or until tender. Honestly, I found it much easier using tinned chickpeas, and the dish still tasted lovely.
Place a small frying pan over direct medium heat, add the cumin and coriander seeds and toss them around in a hot pan for about 2-3 minutes or until they start to dance and change colour. Then remove the seeds to a pestle and mortar and crush them coarsely and transfer them to a plate. Next, crush the saffron stamens to a powder with the pestle and mortar, then squeeze out the juice of one of the lemons and add it to the saffron, stirring well.
Then season your chicken pieces well with salt and pepper. Slice the peppers in half, remove the seeds and pith and cut each half into 4 large pieces. The onions should be sliced roughly the same size as the peppers. Now heat 1 tablespoon of the olive oil in the flameproof casserole and, when it’s really hot, brown the chicken pieces on all sides – don’t overcrowd the pan; it’s best to do it in 2 batches, 4 pieces at a time.
After that, remove the chicken pieces to a plate, then add the second tablespoon of oil and turn the heat to its highest setting. When the oil is really hot, add the peppers and onions and cook them in the hot oil, moving them around until their edges are slightly blackened – this should take about 5 minutes – then turn the heat down. Strip the coriander leaves from the stalks, wrap them in a piece of clingfilm and keep them in the fridge. Then chop the coriander stalks finely and add these to the peppers and onions, along with the garlic, chillies, crushed spices, the chickpeas and rice, then give everything a good stir to distribute all the ingredients.
Season well with salt and pepper, then combine the lemon and saffron mixture with the stock and wine, pour it all in to the casserole and stir well. Cut the remaining lemon into thin slices and push these well into the liquid. Now scatter the olives in and, finally, place the pieces of chicken on top of everything. Cover with a tight-fitting lid and place in the pre-heated oven for 1 hour or until the rice and chickpeas are tender. Then, just before serving, scatter the coriander leaves on top and serve straight away.
Lemon drizzle cake January 17, 2010
Posted by Helen in cakes, dessert.add a comment
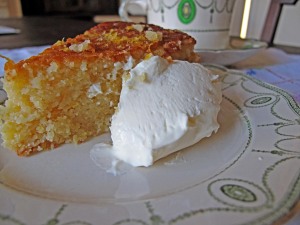
I love anything with lemon in it, and this cake from Olive magazine didn’t disappoint. With its soft crumbly inside and sugary crunchy lemony topping … just heavenly with a big mug of coffee on a chilly afternoon.
Ingredients
225g butter, softened
225g caster sugar
Lemons, 3 zested, 2 juiced
4 medium eggs, lightly whisked
200g self-raising flour
1 tsp baking powder
50g ground almonds
Icing sugar
Preheat your oven to 180°C (160°C fan). Butter and line the base of a 20cm cake tin.
Beat the butter and caster sugar in a large bowl until pale and creamy. Add the lemon zest (reserving some for the topping) and mix well. Whisk the eggs gradually into the butter mixture, beating well between each addition – don’t worry if it curdles.
Sift together the flour and baking powder and fold into the cake mixture using a large metal spoon or spatula. Add the ground almonds and ¾ of the lemon juice, and fold until thoroughly combined. Spoon into the prepared cake tin and bake for 1 hour 15 minutes or until a skewer inserted into the middle of the cake comes out without any raw mix on it.
Put the cake tin on a wire rack to cool for 10 minutes. Meanwhile mix together the remaining lemon juice and zest and enough icing sugar to make a runny icing and then drizzle over the top of the cake. Cool in the tin for a further 30 minutes and then remove from the tin and cool completely before serving.
Serve as a pudding, dressed up with a dollop of crème fraîche.
Pumpkin fillo triangles December 24, 2009
Posted by Helen in nibbles, Uncategorized.1 comment so far
I normally make these little triangles with goat’s cheese and wild mushrooms, but as I was serving stuffed mushrooms alongside them this Christmas Eve, I decided to try a different filling. They’re called pumpkin triangles, but I cheated and used sweet potato instead. Actually, it wasn’t so much cheating as improvising as I was unable to find any pumpkin purée. I just baked one quite large sweet potato, and it yielded enough mashed contents for this recipe. 
Ingredients
300g pumpkin or sweet potato purée
200g feta cheese, crumbled (next time, I think I’d add more feta for an extra zing)
1 egg, beaten
1 tsp salt
1/2 Tbsp dried red chili flakes
Ground black pepper
Frozen or fresh fillo pastry
Lots of melted butter
Olive oil
Mix together the sweet potato, feta cheese, egg, salt, chili flakes and black pepper.
If using frozen fillo, make sure it’s thawed completely. Put one sheet of the pastry on your worktop with the long edges facing you. Brush it with melted butter. Top with a second sheet and brush with more butter, then top with a third. (Make sure that you keep the fillo you’re not working with covered with a damp teatowel so it doesn’t dry out!)
Cut the three-layered fillo into six strips the short way. Put a small spoonful of the sweet potato filling about half an inch from the top of each strip. Don’t overfill, or the triangles will split. Then the complicated folding begins. This is the fun part. Gently lift the pastry corner and fold it tightly diagonally over the filling to create a triangle (take care not to tear pastry). Continue folding, keeping the triangle shape. I’m probably not explaining it very well, but this website has some better instructions, along with photos to demonstrate the technique. It’s very easy once you get the hang of it.
Spray the triangles or brush them lightly with olive oil. Bake for about 30 minutes at 200C.
Smoked oyster puffs December 24, 2009
Posted by Helen in fish, nibbles.1 comment so far
These were the easiest things in the world to put together, yet looked rather impressive and tasted wonderful! They were less about cooking and more about assembling!
Ingredients
100g cream cheese
2 Tbsp mayonnaise
1 tin smoked oysters
10-12 frozen puff pastry vol-au-vent cases
Freshly ground black pepper to taste
Combine the cream cheese, mayonnaise, pepper and one of the smoked oysters in either a blender or food processor. Bake the vol-au-vent cases according to the directions. Put a spoonful of the cream cheese mixture in each case and top with a whole smoked oyster.


